101 Series: Set Your Reference Like a Wizard!
August 27, 2019 / General, 101 learning, Installation and testing, Best Practices
When it comes to testing fiber systems, connector loss refers to the loss of a mated pair of connectors – it’s actually impossible to measure a single connector. To test the loss of the first connector, it must be mated to a similar, known quality connector. That’s where Test Reference Cords (TRCs) come in.
But you’ve got to take into account the loss of the TRCs by calibrating your tester to 0 dB of loss. This is done by setting a reference, and it is the most important step in Tier 1 fiber testing using an optical loss test set (OLTS) like Fluke Networks’ CertiFiber® Pro. You can think of setting a reference like placing a bowl on a scale and then calibrating the scale to zero to achieve an accurate weight reading for whatever you place in the bowl.
Setting a reference needs to be done whenever the TRC has been removed from the output port on your tester, and whenever the TRC has been cleaned and inspected. But don’t let setting the reference scare you – as long as you let your tester warm up and choose the right configuration, you can set your reference like a wizard.

Getting Ready
Before you start testing, the first step is to turn on your tester and let it warm up for at least five minutes to allow the source to stabilize. Setting the reference without the tester no properly warmed up can cause negative loss results. It’s also important to follow the golden rule with TRCs – inspecting, cleaning and inspecting again. Just because the TRC is brand new out of the bag, that doesn’t mean it’s clean.
You also need to set up your test configuration by selecting what you’re testing and which test method you’re going to use – the 1-jumper, 2-jumper or 3-jumper reference. The 1-jumper reference is the default since this is what you will almost always use when testing from patch panel to patch panel. It is the method recommended by industry standards and the only one that includes the loss of the connections at both ends, which is ultimately how the cabling plant will be used.
It’s That Easy
When it comes to setting the reference, you don’t really need to over think it when using Fluke Networks’ CertiFiber Pro. Once you’ve configured your tester, the Set Reference Wizard actually takes you step by step through the process using animation. Just tap SET REFERENCE and select RUN WIZARD.
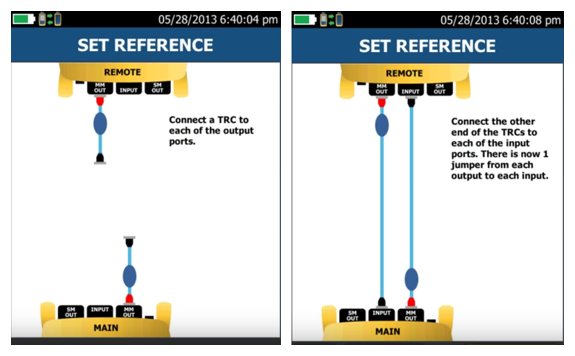
The first screen shows you (and tells you) to connect the red end of your two encircled flux TRCs to the output ports of the mainframe and remote units. Once you connect your TRCs to the output ports, just tap NEXT and follow the Wizard’s instructions for connecting the mainframe and remote units together by connecting the black end of the TRCs to the input ports. You’ll hear a tone and see an icon to let you know that the two units have been connected. Then simply tap SET REFERENCE and the reference is set after just a few seconds.
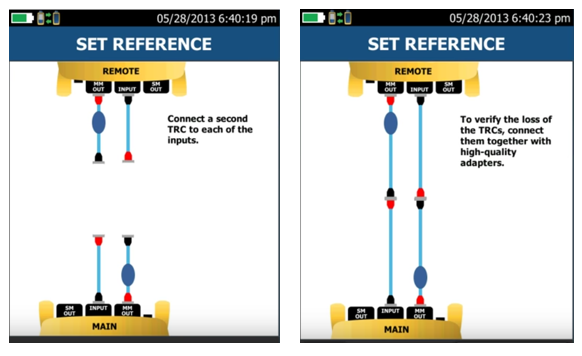
Once the reference has been set, the Wizard tells you to disconnect the input ports. (You never want to disconnect the TRC from the output ports or you’ll invalidate the reference and need to start over). The Wizard then steps you through the process of verifying the TRCs by connecting a second TRC to each the input ports, joining the cords together using a duplex bulkhead adapter (singlemode bulkhead adapters are recommended as they typically provide better alignment), and selecting TRC VERIFICATION. The goal is for multimode TRCs to be better than 0.1 dB and for singlemode TRCs to be better than 0.2 dB. Verifying your TRCs lets you know that when a link fails, it’s not caused by poor TRCs.
Once verified, simply disconnect the cords from the bulkhead adapter, press HOME and you’re ready to test. The good news is that the results of the TRC verification are automatically stored in the tester and included on your test results for your reference – and for your customer’s.
Letzte Beiträge Alle anzeigen >
Was ist PoE-Verhandlung?
30. Juni 2025
Wi-Fi 7 vs. Wi-Fi 6: Was ist neu und was bedeutet das für Ihr Netzwerk?
25. November 2024
Zertifizierung von Netzwerkkabeln von Drittanbietern: Was Sie wissen müssen
18. September 2024
Weitere allgemeine Beiträge Alle anzeigen >
Was ist PoE-Verhandlung?
30. Juni 2025
Was Sie über VSFF-Steckverbinder wissen sollten
27. Mai 2025
DC-Widerstandsunsymmetrie: Was Sie wissen müssen
20. Mai 2025
Unsere Produkte entdecken
CertiFiber® Pro-Testsatz für die optische Dämpfung