How to Set Up DSX-5000 for New Installation?
August 25, 2016 / General, 101 learning, Installation and testing, Best Practices
Getting the right setup to ensure the best test results with your DSX-5000
If you turn up to a new installation with your new DSX-5000 then it might be up to you to ensure the DSX-5000 is set up correctly. So what do you have to do?
Well, if it’s brand new out of the box, then you need to do a basic set up. But, with every new project there may need to be changes if you make installations tests in other countries or time zones with different requirements for date or time differences, or different formats for them or numbers.
Set ups need to be made for …..
- Language
- Date / Time
- Date and |Time format
- Length units
- Power units
- Number format
Some of these settings are critical to be set up on the unit prior to testing and some can be changed in LinkWare (the Cable Test Management Software) which lets you manage all the results and produce reports from multiple testers using one PC application.
Language: The first setup should be the language. You will find this from the HOME screen by pressing the TOOLS button that is a spanner and screwdriver icon. You will have to swipe up to see the Language button. Here you can set your language of preference. However, if the preference is to use the DSX-5000 in one language, but produce the report in another language, you will be pleased to know that you can change the language of the report in the LinkWare software.
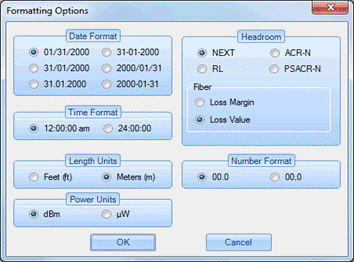
This can also be done for Length units (Meters or Feet), Power units (dBm or µW) and the number format (00.0 or 00,0).
Please note, if you don’t see your language available to set, then it may be that you have purchased your unit from an unauthorised Distributor and you may not have any warranty.
Date and Time: Date and time will initially be set at the local date and time for the Northwest coast of America. So, if you are eight or more hours away from that date line then both the date and time will likely need setting. This is critical as both the date and time cannot be changed in the LinkWare software, potentially causing a big problem when the report is produced with the wrong date and or time when the tests were made. However it is possible to change the date and time format in LinkWare.
Settings that affect power: The battery power status can be seen in the top left-hand corner of the main unit and by observing the front panel LEDs on the Remote unit. Battery status of the remote unit can also be observed by connecting a Permanent link adapter cable to a channel connection on the remote unit, then viewing the battery status under the TOOLS button.
There are a number of settings that can affect how you use or waste battery power. The first of these is the time out periods for the backlight and the power down on the Main unit. Both of these settings can be found under the Timeout Period in TOOLS. The backlight can be disabled or set to be turned off 5, 10 or 15 mins of no activity. The Power down can also be disabled or set to power down after 10, 20 or 30 minutes of no activity. We suggest you do not put the Power down mode into Disabled, otherwise if you put the Main unit back into the case with the unit still powered on; it will not power down and therefore have no charge when you come to use it again! The remote unit has no power down setting, but will automatically power down after 60 minutes of no activity. The second of these is the display brightness setting. The brighter the setting, the more power will be used. To see the impact of the brightness setting increase the brightness and note the new battery status.
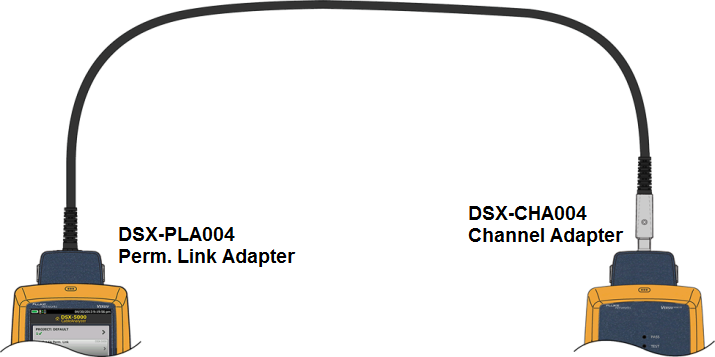
Setting a Reference: Many people assume the reference only needs to be set once and need not be set again unless the modules are recalibrated; this is NOT correct. Setting the reference synchronises the remote unit to the main unit. To set the reference both the main and remote units should be powered on for a minimum of 5 minutes. Setting the reference is conducted by connecting a permanent link adapter on the main unit to a channel adapter on the remote unit. (See diagram) To run set reference, select the SET REFERENCE function under TOOLS and the Main unit will display when the set reference is complete. Up to eight remote units can be referenced to one Main unit. Setting the Reference is an important setting that should be made every time you start a new set of tests i.e. at the start of every shift or a movement of building or inside to outside of a building or where a change of temperature may occur and the unit needs to be back into a warmed up state.
So the LinkWare Software can get you out of trouble if you want to change the format of the date, time and the unit of length, power or number format but, cannot get you off the hook if you have set the wrong date, time, not set reference or arrived on a job with a unit with no power!
 Barry Lindsley has 44 years of experience in the Test and Measurement industry working with Tektronix, Fluke and Fluke Networks. Of which 23 years have been in the networks business. During this time he was working in either technical or combined technical and marketing roles. He also chaired the TIA (UK) Sig 11 group chairman working on CAT5E testing. For the last 3 years Barry has owned a consulting company which provides networking technical and marketing professional services.
Letzte Beiträge Alle anzeigen >
Was ist Glasfasertechnik? Ein Leitfaden
20. März 2024
Der ultimative Leitfaden für Netzwerk- und Kabeltests
13. März 2024
Auswahl von Litzen - und Volldrahtkabeln
06. März 2024
Was ist Rückflussdämpfung?
14. Februar 2023
Drei Gründe, warum die Kabelzertifizierung wichtiger denn je ist
05. Januar 2023
Weitere allgemeine Beiträge Alle anzeigen >
Was ist Glasfasertechnik? Ein Leitfaden
20. März 2024
Der ultimative Leitfaden für Netzwerk- und Kabeltests
13. März 2024
Auswahl von Litzen - und Volldrahtkabeln
06. März 2024
So steigern Sie den Wert Ihrer Versiv™-Investition
21. Dezember 2023
Was ist der richtige Weg, um einen MPTL zu testen?
22. August 2023


©2006-2021 Fluke Corporation。保留所有权利。
RM2011, 20/F, SCITECH Tower, 22 Jianguomenwai Avenue, Chaoyang District, Beijing, China
地址:北京市朝阳区建国门外大街22号赛特大厦20层2011室
联系电话:400-8103435
沪ICP备11037028号-15![]()